
When I first started working with Azure SQL Databases, I wasn’t sure what it would take to backup a database. In fact, I wasn’t even sure if this concept was appropriate when it came to databases hosted in “the cloud”. What I found was that the concept of backing up databases in the Azure cloud does still exist, though the terminology is slightly than we are used to with on-premise SQL Server instances.
As evidence that things are different when it comes to backup Azure SQL Databases, the BACKUP DATABASE command is not available. If you try to run a backup statement, an error stating that “Statement ‘BACKUP DATABASE’ is not supported in this version of SQL Server” is returned. Without this command, then how do you create a backup of your database?
If we consider the basics of what a backup of a database is, all we are looking for is a copy of the data and schema that matches what is currently in the database. There are a few ways to accomplish this. For this post, I am going to walk-through the steps required to backup a database to blog storage within the Azure environment. From a high level, the steps are:
- Create a storage account
- Create a container
- Export the database
It may seem like this is too easy of a process to backing up a database, but the reality is that it is this easy. Just being a different platform, doesn’t mean it has to be challenging.
Create a Storage Account
We’ll start this process by assuming that no backups of the Azure SQL Database have ever been done. Based on that, the first step is to create a place to store the database. Begin by logging into the Widows Azure Portal, and browsing to the Storage folder. The screen will look similar to the one included in Figure 1. If you don’t have any storage accounts created, the list will be empty, as in the figure. To create a new storage account, select New, as indicated with the orange arrow.
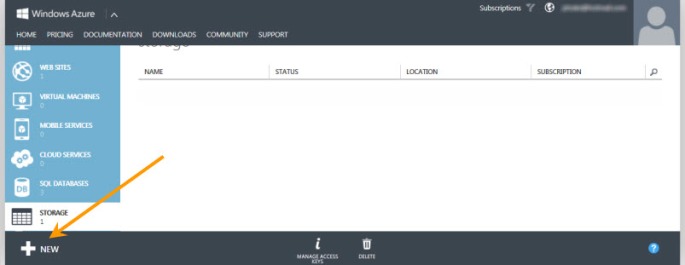
Figure 1. Empty Storage Account List
When it comes to creating the storage account, there are not that many options that are required for completion, but these options are fairly important. The first choice, shown in Figure 2, is deciding on the name for the storage account. The only requirement on this name is that the name is in all lowercase letters. Use what makes sense. The next two are pretty important though. First, decide which location/affinity group to have the storage located in. This is important because you’l likely want to keep this in the data center that the database is located in to reduce the costs incurred in moving around the data. Remember with Windows Azure, and other cloud solutions, you pay for what you use; which includes all of your network traffic. The last choice is the subscription under which the storage account will be created. Be sure to select the correct subscription to make certain that the correct account is charged for the backups.
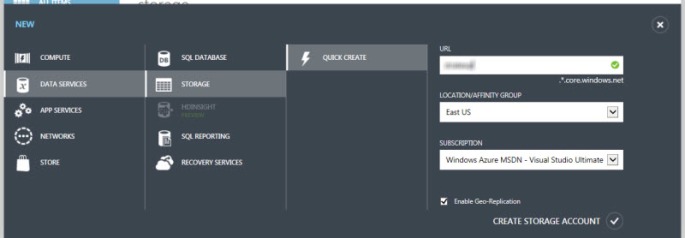
Figure 2. Create Storage Account Wizard
With the details in place, select the Create Storage Account button. This will start the process for creating the storage account; which can take a few minutes. While the storage account is being created, the status for the account will indicate that it is being created. Once finished, the storage account will be listed under storage accounts with the status of Online, as shown in Figure 3.
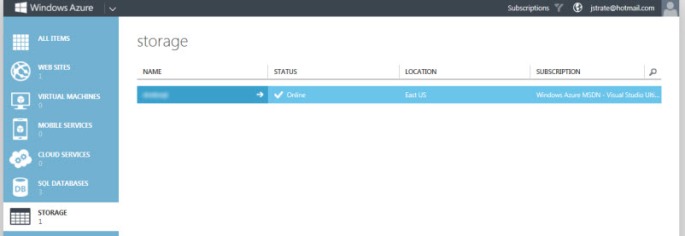
Figure 3. Storage Account List with New Storage Account
Create a Container
Once the storage account is created, the next object needed is a container. The container creates a location that the database can be backed up to and the pathing required to access the data stored. To create the container, start by browsing to the newly created storage account and selecting the Containers listing, shown in Figure 4. From this screen, select the Add Container button, highlighted by the orange arrow in the figure.
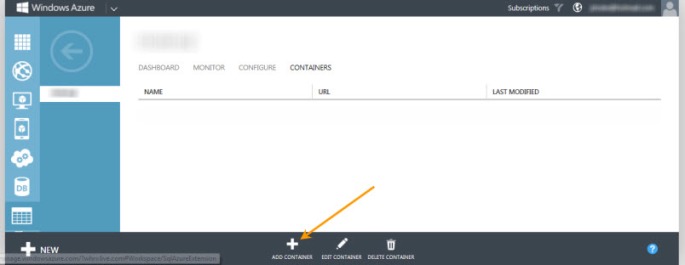
Figure 4. Empty Container List Under Storage Account
The wizard for creating a container under the storage account is relatively simple. The wizard requires two choices to be made to create the container, shown in Figure 5. The first choice involves choosing a new for the container, again with lower-case letters. The second choice is to select the access granted for the container. Since the purpose of the container is to store a backup of the database, you should select Private access. There aren’t many cases where a backup of your databases should be accessible via anonymous access.

Figure 5. Create Container Wizard
Once the container wizard is completed, the container will become available. Once the container is created, it will be listed under the Containers list for the Storage Account, shown in Figure 6. With the container name, the URL for accessing the container is also provided on this screen.
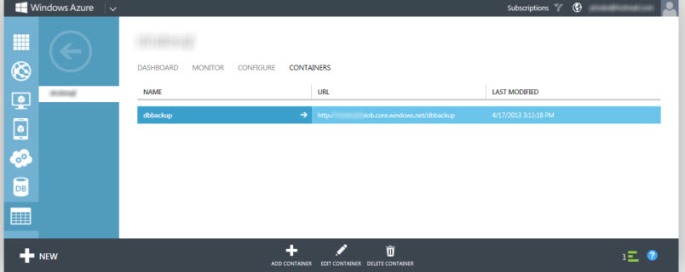
Figure 6. Container List Under Storage Account with New Container
Export the Database
With a storage account and container created, there is now a place to backup the Azure SQL Database. In Azure terms, backing up the database is basically copying the database from one place to another to make a point-in-time copy of the data. The reality, though, that’s all backing up a database is and with an Azure SQL Database, creating a backup is done by exporting the database. The Export button is located at the bottom of the Database Dashboard, indicated by the orange arrow in Figure 7.

Figure 7. Database Dashboard
Once the export is started, the Export Database Settings screen will appear, showing in Figure 8. As with the other screens, there are a few options that need to be selected. The first is the name of the bacpac file; which is the format for the exporting from Azure SQL Database and is similar to DACPACs with the addition of data. Next select the subscription that ties to the Storage Account and Container where the backup will be stored. Once that is completed, enter an account and password with access to the database and start the export.
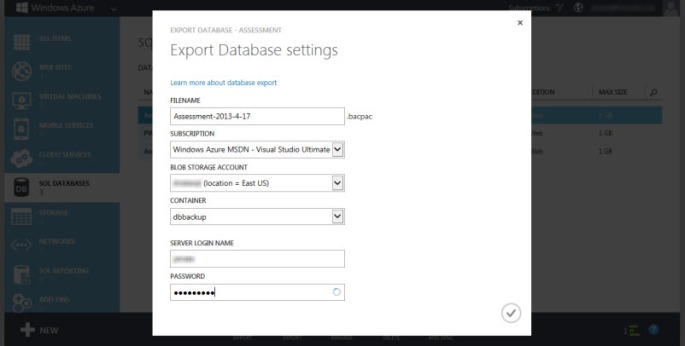
Figure 8. Export Database Settings Screen
When the export of the database is completed, it will appear in the container that was created in a previous step. As shown in Figure 9, the backup information includes the name, size and URL for accessing the backup. At this point, the backup is created and ready for what ever you need it for. If you want, you can even download it directly from the Azure portal, as shown by the arrow in Figure 9.
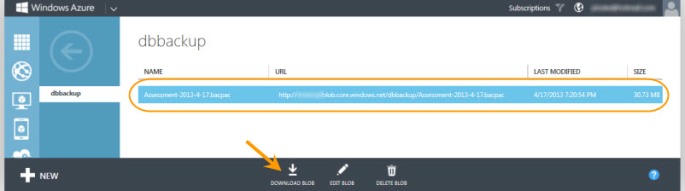
Figure 9. Empty Storage Account List
Summary
In this post, I covered the steps needed to create a backup, or export, of an Azure SQL Database. There are other ways available to accomplish this task, but this is the one that I turn to most often with the work that I am required to complete. With more complex Azure architectures, this may not be the ideal backup process, since this export focused on a single database. But for starting out with Azure SQL Databases and needing to accomplish that first and easy backup, this is the way to go.
For those with experience with backups in the cloud, are there options that I haven’t considered and should? Any gotchas that you’ve run into while working on backups?
*UPDATE
Earlier this month, Grant Fritchey (Blog | @GFritchey) released a video of backing up an Azure SQL Database.

Jason, I am having a hard time finding a scenario when the export process you’ve described is preferable to what SQLBackupAndFTP with Azure (http://sqlbackupandftp.com/) gives you out of the box. The biggest difference is running automated backups on schedule – that program is created for it. When you need ad hoc backup – just open the previously created job and press “Run”. It also adds compression, encryption, email notifications on success and failure, storage in Amazon S3, Dropbox, Network, HDD, Google Drive, Box – most of it available in Free version.
So I am just puzzled why do it more complicated than it needs to be?
LikeLike
Keep in mind that these backups are not transactionally consistent; when you get to the restore step it’s not unusual to find you have a bacpac from a busy system that can’t be restored due to constraint violations. It’s good practice to backup from a copy of the database to ensure you the database is in a stable state from beginning to end. Some 3rd party tools offer this (for instance Redgate’s Cloud Services – I don’t work for them, just a customer).
LikeLike
Thanks for the feedback, Eli. That’s a good point about the transactional consistency of the database. For my purposes, a simple copy of the database, the basic export was sufficient. As databases become more complex, their backup processes in azure will need to evolve, similar to how they evolve with on-premise databases.
LikeLike